Rust, it ruins your tools, it ruins your cars ... it likes to eat most anything iron. An ounce of prevention is worth a pound of cure when it comes to rust. The folk over at Practical Machinist have a forum article on Rust inhibitors should you desire the ounce of rust prevention. Bob Neidorff wrote a pretty good Rust Primer which includes both rust prevention and rust removal. This note discusses when you failed to take the ounce of prevention and need the pound of cure.
I am sure we have all tried the good old standby techniques of steel wool, sand paper, naval jelly and the two ton solution of sand blasting. Of those only sand blasting allows the use of massive power tools, but it is also the most destructive to the parts in question.
I ran into an interesting thread on www.tractorbynet.com on sand blasting where electrolytic rust removal was suggested as an alternative to sand blasting and other methods of rust removal. Electrolytic rust removal actually reverses the rust process and returns the iron back to the original part. Sound too good to be true? I thought so but a link was provided so I thought I would give it a try.
While I try to keep up on various obsure fields, clock restoration is one field I have missed so far. On the other hand, a clock restoration site is where you can find this fine article on electrolytic rust removal.
 The processes spiked my curiosity so I decided to see if it really
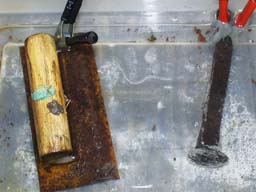
worked. I decided to test the process on a concrete edger that got
left out after a job.
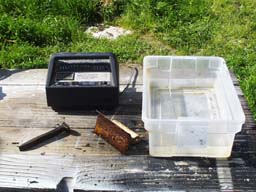
I used an old railroad spike as the iron electrode and a costco
special battery charger as the power supply.
Two tablespoons of baking soda were mixed with a couple gallons of
water in a rubbermaid tub and the experiment began. I did not have
washing soda (sodium carbonate) and someone suggested that baking
soda (sodium bicarbonate) might work so I gave it a shot.
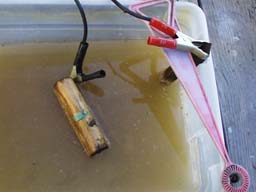
Bubbles started forming almost immediately after hooking everything
up with less than an amp of current being drawn from the battery charger.
The processes spiked my curiosity so I decided to see if it really
worked. I decided to test the process on a concrete edger that got
left out after a job.
I used an old railroad spike as the iron electrode and a costco
special battery charger as the power supply.
Two tablespoons of baking soda were mixed with a couple gallons of
water in a rubbermaid tub and the experiment began. I did not have
washing soda (sodium carbonate) and someone suggested that baking
soda (sodium bicarbonate) might work so I gave it a shot.
Bubbles started forming almost immediately after hooking everything
up with less than an amp of current being drawn from the battery charger.
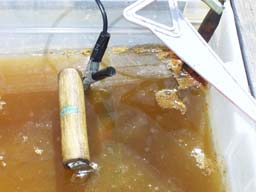 After about an hour the mixture got down right nasty looking and an
inspection of the part showed the rust starting to flake off leaving
good clean metal underneath. I moved the part every half hour to
an hour for the next couple of hours turning it every so often to
get different surfaces facing the electrode. The next day everything
was done.
After about an hour the mixture got down right nasty looking and an
inspection of the part showed the rust starting to flake off leaving
good clean metal underneath. I moved the part every half hour to
an hour for the next couple of hours turning it every so often to
get different surfaces facing the electrode. The next day everything
was done.
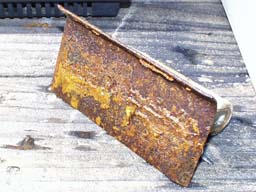
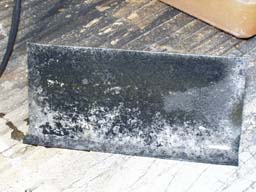 The results? Pretty good if I do say so myself.
If you somehow manage to forget to put a tool away and it winds up looking
as bad as the edger on the left, an overnight soaking in a tub full of
baking soda with a battery charger can make it look like the one on the
right. Not as good as new but certainly an improvement without all the
scrubbing and scraping or material removal typically found with other
rust removal techniques.
The results? Pretty good if I do say so myself.
If you somehow manage to forget to put a tool away and it winds up looking
as bad as the edger on the left, an overnight soaking in a tub full of
baking soda with a battery charger can make it look like the one on the
right. Not as good as new but certainly an improvement without all the
scrubbing and scraping or material removal typically found with other
rust removal techniques.
The next step is to prevent the formation of additional rust. Many suggest that a quick dip in phosphoric acid followed by a shot of a rust inhibitor is the way to go. Myself, all I did was hit it with a shot of wd-40 which kept the part rust free for about 6 months. Doing it right probably would have lasted a bit longer.
So, if you somehow forgot that tool and it ended up a bit rusty, consider using electrolytic rust removal as one step in the process of renovating the part.
Copyright © 2001-2016 by Fractal
Hosting by ziandra.net